Wing Chair Recovery - Part II
Only for those of you who already forgot how the wing chair looked when I first got it, here is a picutre which I took in the thrift store!
For the amazing price of $18 it is all mine.
Too nasty to sit in, I first ripped off all of the fabric, (I'll spare you the details, since I blogged about that before)
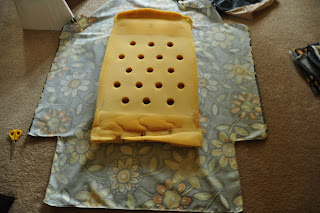
layed the old fabric out, cut the new fabric pieces a little bigger than the old ones and made little fabric piles. I bought about 9' of fabric online at http://www.fabric.com/


I kept all of the old buttons, cut little circles and sewed fabric on each of them. I can tell you, that was my least favorite part.

After all 27 buttons were done, the back seat was the first piece that I re-buttoned.
The buttons go all the way through the fabric and cushion - the back part gets spread apart and rests on the foam.
I put the cushion in place and stapled it firm to the back.
Repeated all those steps with the seat.
For the arms, I had to put some more batting in, since I had to get rid of all the old material - nasty stuff. I guess after 20 years it was time to get replaced. Did I mention that the chair was build in 1992? Not sure if that is old for a wing chair?
I tried to follow some instructions on the internet on how to recover a wing chair, but gave up after step number three, and just did what I thought was best. I cross-stiched every piece first, so it wouldn't rip and then layed it on the side it needed to go and stapled it to the back or bottom.
It is still resting on my trash can. When I sent this picture to my mom, she thought I came up with a cool idea for the legs, but no, I just needed the space to better staple the fabric to the bottom.
I turned the chair up side down to attach some wooden sticks to the spirals. Held them in place with chicken wire, but the first second I sat in that chair, all three of the sticks broke. Good idea, but worthless. So I removed the broken sticks again and just decided that no heavy people will sit in the chair.
I put the legs back on, sanded them in the room (not a good idea!) But if you are lazy, try it, you will have more work afterwards to clean about every single corner of the room. I learned from our last mistake and at least closed the door this time, so the dust wouldnt' be in the whole house.
I painted the feet in a dark brown color, which I still had left from various projects.
From this picture you can't really tell that the back and the sides are not done yet. I need a break and it is already so comfortable sitting in it that there is no urgency. The bottom sides are still uncovered, and I need to get a second opinion on how to finish it.
I made a pillow for my new little foot stool, which I also bought at Borders, for $15. After painting it the same color as the feet of the wing chair, I attached velcro on the bottom, so that you can still use it as a stepping stool when needed.
After a couple of days off, my eyes were twitching again.. I just needed to finish that chair! I cut out cardboard in the shape of the sides and the back of the chair and attached the fabric to it with carpet nails. After they were in place I hammered them in and used the staple gun some more to straighten up some parts of the fabric which were not completely tight around the chair.
AND IM DONE (after about a week of work)
I already saw another wing chair at Good Will, but Brian already looked weird and I decided not to spoil my luck here.
Have a great week everyone.
Material List:
- an old wing chair
- about 9' fabric of your choice
- hold on to the old fabric to measure your pieces
- staple gun and staples
- batting
- hammer
- card board
- carpet nails
- sand paper
- paint for updating the legs
- a little bit of time and nerves
- For the foot stool you need all the above and some velcro


Comments
Found you on skip to my lou!
How did you "sew" the new circles onto the buttons. I have a similar chair and I was thinking I needed to hot glue the circles on. Thanks!!!!
What I had said was, GOOD JOB! That chair looks so fantastic, and you should be so proud of yourself! :)
Serena
www.ThriftDiving.com
Katie
www.athomewhenimwithyou.blogspot.com
über den Blog Better After bin ich hierhergekommen...
Wahnsinn, Deine Sessel-Rettung...
Selbst habe ich für knapp 3 Jahre in TN gelebt...
allerdings bin ich schon eine ganze Weile wieder in Germany ;-)))
Bei Euch ist es bestimmt jetzt schon sehr warm... da beneide ich Dich schon etwas... hier ist es für die Jahreszeit immer noch recht frisch...
LG aus Baden Württemberg
Andrea
Deiner ist wirklich toll geworden!
LG aus Tennessee!