The Nursery - Final reveal
I know you couldn't wait any longer to find out if we are going to have a boy or girl. I don't keep it any longer from you, I promise.
Both of us wanted a boy, but really just a healthy little baby is all we asked for.
Since I don't count to the younger childbearing generation anymore, there were some tests that I had to do. One of them is for down syndrome. Scary stuff, let me tell you. With that test though, you can find out the gender and when I received the call with the results, I immediately started crying.
Happy and over the moon that the baby is completely healthy but totally in shock that it is a.... CAN YOU SAY BOY???
No wonder I have hair growing like crazy in my face, all this testosterone in me probably doesn't help the weirdest pregnancy outcomes. At least (so far) I haven't been too bitchy, hormonal. Don't ask Brian though, he would probably tell you differently.
I called Brian to tell him and the only thing he said was "I told you so!" MEN..
I could tell though that he was somewhat relieved.
Finally I will get to learn those football rules from the start on and in toddler description. It might help me understand.. We'll see.
Several months later we finally got the confirmation on an ultrasound.
Before then that little guy was to shy to show himself.

Back to our nursery though.
After my travel (New York, Frankfurt/Germany, Houston and Chicago) was over for just a couple of weeks I started looking for furniture we could use for the nursery. Several Good Will visits, auctions and yard sales later, I had some items to work with.
I took over a couple of small shelves that a friend disposed after moving out of State.
After a fresh coat of white paint, they were hung on the wall.

A little very beat up rocking horse caught my eye at an auction that I just had to have. After repairing its legs and painting it, it will keep the bigger one company.

Of course some painted signs had to be made for over the crib.

Toby is already pretty comfortable in the room, awaiting it's new renter.


Looking at crib bumpers that would go with the design I had in mind, and seeing the ridiculous prices for those, I decided on making them myself.
I bought some fabric, batting and added some leftover ribbon.

Cutting 4 pieces to size
(taking the measurements of the two different width of our crib and the height of the one I saw online)

folding the fabric over right side out, adding some batting inside and pinning the ribbon to it to make sure it is all centered.
Turning it in side out I sewed three sides close before turning it back to the outer side to sew over it and shut it.


All done and the crib is looking more comfy.
Now we are just waiting for the mattress to join this little bed.


Moving over to the last of the four walls.
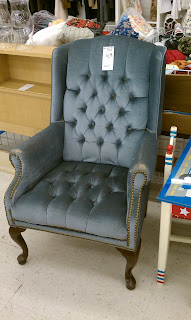
For $14 I found a Glider at my favorite Good Will store.
The cushions were stained and pretty nasty.
I took it all off and washed the cushions and cleaned the complete chair from spider webs.

After a couple coats of light grey chalk paint and a new cushion cover it was nursery approved.

Unfortunately it didn't come with a stool. Looking around in our basement I found the perfect one though. Does this happen to you too? I'm a little hoarder, can use almost everything and store it in our basement. Most of the time I find a purpose for those items.
The stool was part of an old sewing machine table (that is also living in our basement) and we didn't have any purpose for it.

After measuring the height of the glider, I cut the legs to the correct size,

and painted the stool in the same color as the glider,

upholstered the cushion with the same grey outdoor fabric,

and tada, a new complete nursery chair was born.
To many comfy nursing hours.

And just because I had lots of turquoise and grey fabric samples laying around and because I was bored - I made a quilt from it for many tummy time hours on the floor.


On the web I found a cute idea for a coat rack that I needed to copy.
I cut a wooden panel to size, painted it light grey, printed out 4 different animal bums (with the help of Martha Stewart) With a pencil and carbon paper I transferred the animals onto the wooden panel.

Leftover adhesive vinyl cut to small stripes were stuck to the zebra and tiger in a zigzag design.

After the outline and stripes were done, I took a small brush and colored it all in.
Black hangers completed the project and made the perfect look of tails.
The coat rack is done. For now my diaper bag is proudly hanging from it.


The wall was still very empty and needed some sprucing up though.

Looking all over Pinterest for ideas I found a cute little wall decal that I liked.
I got to work on my Silhouette. Ordered several different colors of adhesive vinyl and sat for several hours on my behind recreating the design. The complete dimensions are 55w x 75h. Cutting the complete design in sections of 12x12 sheets was the hardest part.

After everything was cut and labeled, I attached the first sticker to the wall.

It took several hours to still figure out what goes where and to make sure all the lines match up.
If you look closely you can see the overlapping parts. You can tell that it is handmade and that makes me somewhat proud even if it isn't all perfect.
5 12x12 sheets down, I needed a small break - and didn't take any more pictures of the process.

So here is the end result of my new wall decal.


A neutral color palette with a splash of turquoise was what I had in mind no matter the gender. Ones there are toys added to the room it will get more colorful anyways. So for now, I'm pretty happy how it turned out.
I have to say, I'm kinda sad that this room is mostly done.
Already looking for another "project", which will come in about 2 months! :)

Comments
Valerie